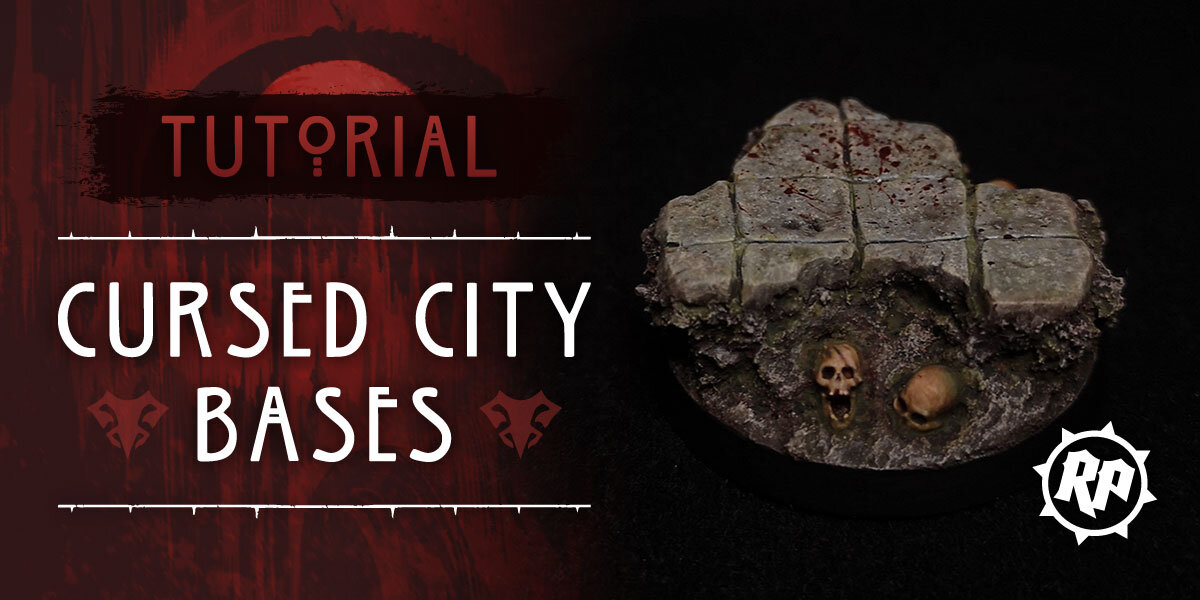
Tutorial: Cursed City Bases
/
With the release of Warhammer Quest: Cursed City just around the corner at the time of writing, I’m as excited as anyone for what looks to be the best Warhammer Quest yet. In fact, I’m so eager to crack it open and get started painting the models that I’ve already started planning how I’m going to base them! I want these fantastic models to look extra special, and in this basing tutorial I’ll show you my method for creating these creepy scenic bases.
Of course, you don’t have to use these bases for Cursed City models. I think they’d look great for a whole range of models, armies and factions, particularly Soulblight Gravelords, Legions of Nagash, Nighthaunt and Flesh-eater Courts. Let’s get started!
Materials Used:
40mm Round Base
Cork Mat or Coaster
Superglue
Filler
PVA Glue / Elmer’s Glue
Green Stuff
Miniature Skulls (or other accessories)
Army Painter Brown Fur Spray
Citadel Paints Used:
Abaddon Black
Agrax Earthshade
Astrogranite Debris
Athonian Camoshade
Baneblade Brown
Blood For The Blood God
Dawnstone
Death World Forest
Dryad Bark
Flayed One Flesh
Gorthor Brown
Karak Stone
Lahmian Medium
Mechanicus Standard Grey
Nuln Oil Gloss
Pallid Wych Flesh
Rakarth Flesh
Reikland Fleshshade
Seraphim Sepia
Wyldwood
Zandri Dust
Psst! If you buy all your paints, brushes and whatnot from Firestorm Games using this link you’ll get a tasty discount on the RRP, and you’ll really be helping me out!
Step 1: Cork Outcrop
To create the outcrop or clod of dried earth upon which the flagstones will rest, you’ll need a sheet of cork - the denser and grainier the better. It can be any thickness you like, but I’d recommend around 3-5mm for smaller bases and around 10mm for larger ones. For this tutorial I’m using a 40mm base and a 10mm thick cork coaster bought cheaply from a thrift shop.
Place your base upside-down on the cork sheet and draw around it with a pen. Then carefully remove the excess cork from around the circle. There’s no need to use a knife for this - doing it by hand will result in a rougher texture, which is exactly what you want. Next you’ll need to keep removing small chunks of cork from your circular piece until you have a shape that you like. I’ve seen people using base clippers for this job, but I just roughly prised the chunks off with my thumbnail like a savage. You do you! Also, hang onto those cork crumbs for later. When you’re happy, superglue the cork to your base.
I like to taper the outcrop so that it’s narrower at the bottom than it is at the top. This creates visual interest and also gives you a little extra space on the surface of the base to add other materials and decorations later. It also means that you can even have the top of the outcrop overhang the rim of the base if you want to, which can look quite striking.
Finally - and this part is optional, though I strongly recommend it - I coated all of the cork with a 50/50 mixture of filler and PVA glue. It should have the consistency of pouring cream, and you can paint it on with an old paintbrush. There are a few reasons why this is a good idea. Firstly, it helps to seal the cork and fill in deep recesses that your primer might have trouble reaching. Secondly, it hardens the cork and makes it a bit more durable. Thirdly, it gives the top of the cork a rougher texture that will help your green stuff stick much more easily in the next step. I say this step is optional because not everyone has filler lying around at home and you can theoretically manage without it, but it will make your life a lot easier. On a side note, the glue/filler mix can be stored in an airtight container for future projects and should remain usable for years - you’ll just need to give it a good stir when you open it back up.
Leave your coating of glue/filler to fully dry before moving on to the next step.
Click on any of the images in this tutorial to see a larger version and some helpful captions.
Step 2: Green Stuff Flagstones
Next it’s time to sculpt the flagstones and, if you’re worried that you can’t sculpt, don’t be! This process is very forgiving. You’ll see that my flagstones look lumpy and uneven as hell, but we can use that to our advantage and when they’re painted up it all seems to work out.
Make up a blob of green stuff and squish it flat with your thumbs and forefingers until it roughly covers the surface of your cork outcrop. You want it to overhang just a little and for none of the cork surface to be visible. The thickness of the green stuff will be the thickness of your flagstones, so this is entirely up to you. I aimed for about 2mm but, as you’ll see, the thickness actually ends up varying quite a lot - this is fine. Press the green stuff gently onto the cork surface - the filler should help it to stick and stay in place, but if you didn’t use the filler then your next best option is to stick it down with superglue.
The next part is where we smooth and flatten the green stuff so that it’s not so uneven, lumpy and covered in thumbprints. You’ll need a very smooth, flat surface that you don’t mind getting a bit messy - a sheet of shiny plasticard, a ceramic dinner plate, something like that. Place a few large drops of water onto your smooth surface. Then, turn your base upside-down and press it gently onto the smooth surface, with the water between the surface and the green stuff. Gently drag the base around the surface in a circular motion, keeping up the gentle pressure. If there’s too much friction and your green stuff is starting to stick, take the base away, add more water and try again. Slowly increase the amount of pressure you apply, trying to keep it evenly distributed across the whole base. Turn the base over and check it periodically to check whether you’ve achieved the desired flat, smooth effect. If you haven’t, you may need to apply more pressure.
Because the cork will be soaking up some of the pressure you’re applying, you probably won’t get your green stuff perfectly smooth and even - again, this is fine. You can see in the second picture below that mine even has a big indentation with a clear thumbprint. It doesn’t matter! The detail that we’re going to add, plus the paint job, will make it barely noticeable.
Turn your base back up the right way, set it down, and carefully dab away any excess water with a paper towel. Next we’re going to add the grooves to mark out the flagstones. This is a simple matter of taking your hobby knife, turning it upside-down so that you’re using the blunt edge of the blade, and dragging it along the surface of the green stuff whilst applying a little pressure. The challenge here is to keep your lines evenly spaced. If you want you can mark out some evenly spaced points on your green stuff using a ruler or, if you’re feeling brave, you can do it by eye. For the record, I did mine by eye and it was a tense experience!
Because I wanted my flagstones to look old and weathered, I gave them a little extra texture by taking a very small (3mm) and roughly textured stone, and rolling it gently around on the green stuff to create subtle, irregular indentations. The more pressure you apply, the rougher the flagstones will look.
When you’re reasonably happy with the look of your flagstones, leave the green stuff to cure, ideally overnight. When it’s hardened, it’s time to cut away the excess around the edges of your outcrop. You can do this with sprue clippers or with a hobby knife, but either way please be extremely careful, as it’s easy to slip and hurt yourself whilst doing this. Also (less importantly) be careful not to cut into the cork if you can help it. You want the edge of the green stuff and the edge of the cork to be as flush as possible. It’s at this point that you may notice that the thickness of your flagstones is uneven - you can see that the thickness of mine varies wildly, but when it’s painted up it will look fine. Everything is fine.
Step 3: Earth & Skulls
The final part of the base building process is to add earth or soil around the outcrop, plus any decorative elements you might like to use. I’ve used skulls as it seems appropriately grisly for Warhammer Quest: Cursed City, but you can have anything you like partially buried under those flagstones - treasure, rusty weapons and so on.
For my base I used Astrogranite Debris. If you’re unfamiliar with it, this is a Citadel texture paint from Games Workshop that dries to create a rough, earthy texture. Astrogranite Debris is the thicker/rougher version, but there’s also a thinner version simply called Astrogranite. The colour is grey, but there are also brown equivalents named Stirland Mud and Stirland Battlemire - feel free to use either colour since you’ll be spraying over them with primer in any case. Whichever colour you use, I recommend the thicker version for larger bases and the thinner version for smaller bases. In fact, I mixed in a few of the cork crumbs left over from earlier with my Astrogranite Debris, just to give it a bit more body.
Apply your Astrogranite Debris around the cork outcrop to cover the entire base. You can slap this on fairly thickly. Then, while it’s still wet, gently press your decorations or accessories into it. When the texture paint is dry it will hold these securely in place. Wipe any excess off the rim of the base. Then leave the texture paint to dry completely, ideally overnight, and you’re then ready to prime your base for painting.
Your base should be primed with a brown spray paint. For my base, I used Army Painter Fur Brown since it’s what I had around and Games Workshop apparently no longer sell a brown spray. Be warned though - I find that Army Painter sprays have a tendency to be too thick and obscure detail. If you use Army Painter then spray cautiously and sparingly. When the spray is dry you’re ready to start painting.
Step 4: Painting the Flagstones
First we’ll paint the flagstones. The reason we paint these before the earth is that having your earthy paint job spill over onto the flagstones will look fine and natural, but having the stony paint job spill over onto the earth won’t. I’m going to cheat a bit here and direct you to my earlier realistic stone tutorial, which is exactly the method I’ve used here (aside from the priming, which we’ve already done - don’t prime it again!).
Here’s a simplified summary of the method, though I recommend reading the full tutorial:
Basecoat with Mechanicus Standard Grey, then layer with Dawnstone, followed by Karak Stone. Wash with Agrax Earthshade. Stipple with Dawnstone, then Rakarth Flesh, followed by Flayed One Flesh and finally Pallid Wych Flesh. Sponge with thinned Reikland Fleshshade, Seraphim Sepia and Athonian Camoshade to finish.
Step 5: Painting the Earth & Skulls
Painting the earth is super easy. First, apply a thick coat of Wyldwood contrast paint, making sure to get it into all of the recesses in the cork. When it’s dry, heavily drybrush the earth with Dryad Bark. Drybrush a little less heavily with Gorthor Brown, a lot less heavily with Baneblade Brown, and finally drybrush fairly lightly with Rakarth Flesh.
With the earth pretty much done, now is the time to paint any of the decorations or accessories you’ve added. I have another tutorial for painting grubby, naturalistic skeletons, a simplified version of which I used for the skulls my base. I applied a basecoat of Zandri Dust, followed by thin layers of Karak Stone and Flayed One Flesh. I then highlighted with Pallid Wych Flesh and finally gave the skulls a wash with Reikland Fleshshade to darken them and make them look like they’d been wallowing in the soil for some time.
Step 6: Final Touches
We’re nearly there! Just two more simple details needed to really make these bases look like they belong in the grim environs of the Cursed City - moss and blood spatter!
To create a simple moss effect without recourse to any fancy scenics products, I created a 50:50 mix of Death World Forest and Lahmian Medium. I then applied this selectively to the recesses of the earth and flagstones. How much you want to add is a matter of personal taste. I also applied it around the skulls to add to the impression that they’ve been sitting there for a long time and let it dry. To knock the brightness back a bit, to help blend the moss with the rest of the base and to give it a bit more variation, I then applied a thin wash of Athonian Camoshade, allowing it to spill a little beyond the edges of the Death World Forest. I also added some to the skulls where the bone meets the earth.
For the blood, I like to mix Blood For The Blood God and Nuln Oil Gloss in a 50:50 proportion. This makes the blood less thick and a lot darker which (in my opinion) looks more realistic, and definitely works better with a darker, creepier base like this. You can of course vary the amount of Nuln Oil Gloss to suit your preference, or not use it at all.
To achieve the blood spatter effect, find a cheap brush with very stiff bristles. Dip it into the blood mixture then, by dragging your thumb rapidly across the bristles, you can flick droplets of blood onto the base. Make sure you have plenty of paper towels covering your work area and try a few practice flicks onto the paper. Make sure you can reliably get the angle of your flicks and the size of the droplets right before you apply it to the base. You may need to prop the base up with something to help get the angle right. Apply as much blood spatter as you like until you’re happy with the result.
To finish the base, simply paint the rim with your preferred colour - I used Abaddon Black, but a very dark and desaturated brown like Dryad Bark would also look good.
And there you have it! It’s certainly not the quickest or simplest method of basing a model, but I love the result and I hope you do too. Plus, if you’re assembling and painting them in stages on a production line, it’s not so bad. I can’t wait to get my hands on the Warhammer Quest: Cursed City set and start prepping more of these bases for all those fantastic models!
If you use this tutorial I’d love to see the results - tweet me @realmofplastic on Twitter or comment on the Realm of Plastic Facebook page.