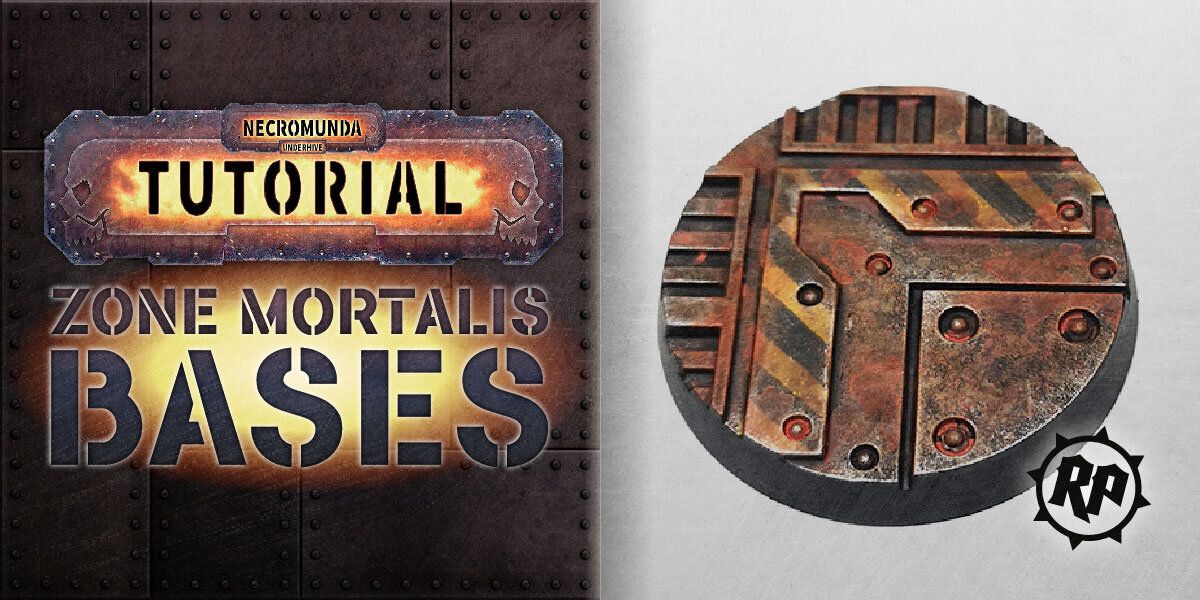
Painting Tutorial: Necromunda Zone Mortalis Bases
/
Since I returned to the Games Workshop hobby in 2015 I’ve been focused pretty much exclusively on Age of Sigmar. More recently I’ve been casting around trying to decide how best to re-immerse myself in the Warhammer 40K setting, and after a brief dalliance with some Space Marines I think I’ve actually ended up settling on Necromunda. And by ‘settling’ I mean ‘fallen hard’. I’ve recently taken delivery of a Necromunda: Dark Uprising box and some Zone Mortalis tiles, but the first order of business is painting up the Goliath gang I’ve had sitting in a box for the last year or so.
I couldn’t wait to get started painting something with a more futuristic and mechanical feel for a change, and so rather than start with the gangers I decided to get stuck right in with the fantastic Zone Mortalis bases that come in the box. You don’t get to paint many hazard stripes in Age of Sigmar, so this proved to be a really fun departure from my usual painting regimen. I shared the results on social media and was fortunate to receive a very positive response, so I thought I’d put together this ‘little’ basing guide. It’s easier and more fun than the length of this tutorial might suggest, I promise!

Citadel Paints Used:
Abaddon Black
Agrax Earthshade
Averland Sunset
Black Templar (Contrast)
Fire Dragon Bright
Ironbreaker
Mournfang Brown
Rhinox Hide
Ryza Rust
Wild Rider Red
Yriel Yellow
Zandri Dust
Psst! If you buy all your paints, brushes and whatnot from Firestorm Games using this link you’ll get a tasty discount on the RRP, and you’ll really be helping me out!
Step 1: Stippling
You’ll need to start with a nice, dark brown base. This means either priming your Zone Mortalis bases dark brown, or priming them some other colour before applying a basecoat. Mine were primed grey before receiving a basecoat of Rhinox Hide, but you can prime them any colour you like since it won’t be visible. Sadly, Games Workshop no longer make Rhinox Hide spray. Grrr.
Then it’s down to business with some stippling. I have yet to write a tutorial that doesn’t involve stippling - it’s my favourite technique for adding texture and depth to a surface, and as far as I’m concerned it’s the most woefully overlooked weapon in the miniature painter’s arsenal.
If you don’t know, the basic technique goes like this. Take an appropriately sized drybrush, ideally an old one with bristles sticking out all over the place like the hairs in a scavvy’s nostrils, but a newer one will do. In this case I used a Citadel small drybrush. Dip your brush in the unthinned paint straight out of the pot, then wipe off the excess. Dab the tip of the bristles directly onto some tissue paper or kitchen roll at a 90-degree angle a few times to gauge how much paint is on the brush - if you see a single large blob then you need to wipe off more, and if you see barely any paint at all then you’ve wiped off too much. What you really want to see is a cluster of small spots, a sort of speckled effect (this is why splayed bristles are better).
When you see this on the paper you’re ready to apply it to your base in exactly the same way, repeatedly dabbing the tip of the bristles onto the surface at a 90-degree angle to build up a mottled texture. You may need to thin your paint ever so slightly with water if your paint spots are looking a little thick. I started by stippling my Zone Mortalis bases with Mournfang Brown. I then did the same with Wild Rider Red, Fire Dragon Bright and finally Zandri Dust. With each new colour I applied slightly more limited coverage - the Mournfang Brown was applied all over, but by the time I got to Zandri Dust I was only stippling about a quarter of the base.
Click on any of the images in this tutorial to see a larger version.
Step 2: Hazard Stripes
Now it’s time to paint the hazard stripes. Since trying to paint yellow over black is a recipe for madness, fury and snapped brushes, I started by building up a yellow basecoat with Averland Sunset using a Citadel medium layer brush. It’s always best to thin your paints with a little water on the palette, just to help the paint flow a little better from the brush. Averland Sunset is a bit dull for hazard stripes, but it’s part of Citadel’s ‘Base’ range and thus has more pigment for better coverage, so it’s a good foundation to start building up the colour. Nevertheless, I still needed to apply 3 thin coats to build up a decent coverage. Next I applied 3 thin coats of the much brighter Yriel Yellow. Don’t worry if your yellow looks a bit uneven or patchy - it’s going to get covered up with a load of grime, so this won’t be noticeable.
Next it’s time to apply the black stripes. I tend towards quick and lazy methods of painting where I can, but there’s no getting around it - this part of the process requires a little care and patience. I used Contrast paint - Black Templar specifically - to block out the stripes since it flows very easily, allowing you to paint in a way that feels almost like drawing with a felt tip pen. This gives you easier control over the precise placement of your stripes. The Contrast paint will be patchy, but when it’s dry you can paint over it with some thinned Abaddon Black. I used a Citadel small layer brush for this.
To help ensure that the angle of my stripes was consistent, I used the sculpted lines of the Zone Mortalis base as a guide. You’ll notice in the pictures below that my stripes are oriented and aligned exactly to the angle of the the inner diagonal lines on the raised area that the stripes are applied to. I found this really helpful for maintaining consistency. It was slow, painstaking and nervous work for the first base, but I quickly got my eye in and by base number ten I was breezing merrily through it. Again, don’t worry if your lines are a bit wobbly or uneven, since this will be partially disguised when we start adding rust and grime.
After all that hard work, it’s time to cut loose by stippling a little Mournfang Brown haphazardly along the hazard stripes to give the suggestion of rust and grime.
Step 3: Metal
This is the stage where everything starts coming together nicely, and it’s all super simple from hereon in. Drybrush the whole base with Ironbreaker, focusing in particular on the edges. You may want to avoid drybrushing the hazard stripes too heavily so that you don’t cover up all your hard work. Plenty of the stippling should still be showing through too. Then shade or wash the whole base with Agrax Earthshade, making sure it gets into all of those deeply recessed vents, and let it dry completely before moving on to the next stage.
Step 4: Rust & Grime
Rust and grime - this is what Necromunda is all about! This stage can be a little bit scary since you’re going to be deliberately messing up all of your lovely hard work, but be bold, be courageous and trust me!
To begin building up the rust, I first mixed one part Wild Rider Red with 5 parts water. I then applied small pools of this mixture fairly haphazardly to all of the areas where I felt rust might naturally occur. In the picture below I’ve shown this while it’s still drying, just so that you can be mentally prepared for how awful it looks. Don’t worry, it will look better in a bit! Because I used water, these pools left tide marks around the edges when they dried. This was a stylistic choice since I felt it would look more realistically rusty, but if you’re not a fan of the tide marks then you can use Lahmian Medium instead.
When this had dried I found it a little bright for my tastes, so I applied a light wash of Agrax Earthshade on and around the rusted areas just to knock the brightness back and help blend it in with the rest of the base. To further blend in the rust I drybrushed on and around these areas with Ryza Rust, applying more pressure than usual to catch the flat surfaces as well as the edges. This gives a nice matt, powdery effect that helps to create that rusted feel.
Finally, I painted the rims of my bases black with a 50/50 mix of Abaddon Black and Black Templar (Contrast) - it turns out that two thin coats of this will give you the smoothest, flattest black you ever did see in your life! Top tip!
Thus ends a particularly long-winded painting tutorial for Necromunda Zone Mortalis bases. Apparently I like to be thorough! I’m currently painting up my Goliath gang and I can’t wait to pop them onto these bases - my odyssey into the dark heart of the underhive is well and truly underway!
If you use this tutorial I’d love to see the results - tweet me @realmofplastic on Twitter or comment on the Realm of Plastic Facebook page.